This chapter describes how to install and run CRDebug.
Download the appropriate binary archive (named crdebug-bin-bxxx.zip where xxx is the build number) and extract it's contents to a directory of your choosing. Make sure subdirectory extraction is enabled in your ZIP archiver options.
Run CRDebug.exe to start the application. Once started, you should be greeted by the CRDebug main GUI:

Program output should indicate that plugins are successfully loaded and CRDebug initialized. Each plugin loaded will appear as individual tab in the plugin display region of the window.
To make CRDebug listen for connections, enter port number and maximum number of rows you want CRDebug to keep in memory at once and click Activate. The button should turn green, indicating that CRDebug is now waiting for connections. Now would be the right time to launch your application you are going to debug.
To test out CRDebug, run TestApp.exe that comes with CRDebug. It samples sin function in range [0..5] at 0.4 intervals and sends the resulting values to CRDebug.
This chapter describes how to link your application with Connector module in order to debug the application using CRDebug. Presently, C-Connector is the only type of connector available.
Follow these easy steps to link your application with C-Connector:
For a concrete example on how to use C-Connector, take a look at TestApp sample project included with CRDebug.
Within this section, the Connector for C/C++ (CRDLib) API is described. These function prototypes are declared in CRDebug.h;
| Function | Description |
| int CRD_Init(const char *serverAddress, unsigned short port) | Establishes a connection to CRDebug server at the specified IP-address and TCP/IP port. Call this function when the app is initialized. Returns: 1 on success; 0 on error |
| void CRD_Cleanup() | Shuts down the TCP/IP connection and cleans up resources used. Call this function when the app is closing. |
| void CRD_DeclareVar(const char *varname, DataType_t type) | Declares a variable with specified datatype (T_STRING, T_SCALAR or T_FLOATV). This function should be called once for every variable used after CRD_Init() has succeeded. |
| void CRD_BeginFrame() | Call in beginning of the app main loop. |
| void CRD_EndFrame() | Call in end of the app main loop. |
| void CRD_OutputVector(const char *varname, float *v, int len) | Submits vector value. The destination variable must be known by CRDebug prior to calling this function, i.e. declared using CRD_DeclareVar(). Should be called once for each variable every frame. |
| void CRD_OutputString(const char *varname, const char *str) | Same as above, but for character strings. Maximum length for str is 250 chars, excluding the null terminator. |
| void CRD_OutputScalar(const char *varname, float scalar) | Same as above, but for scalar values. |
The data captured from your application is just raw bytes stored in your computer's memory. Plugins take this data and display it in human-readable form. How the data is displayed depends on the plugin and it's application. CRDebug currently includes two plugins for visualization of the data.
See the Developers section for information on how to program your own plugins.
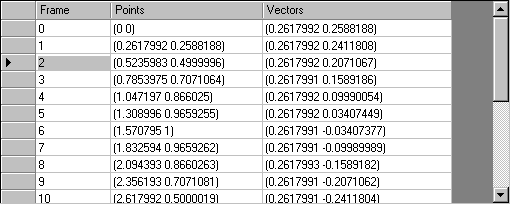
Provides a tabular view of the captured data. Each variable will get it's own column and frames become rows of the table. TableView is useful for precise numerical analysis of the captured data.

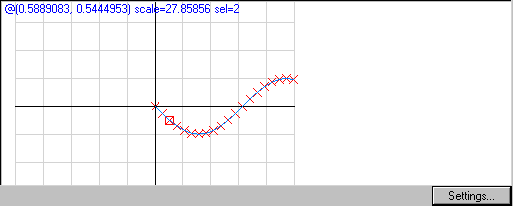
2D Plotter plots vector quantities onto XY plane. Notice that vector (T_FLOATV) is the only datatype usable by this plugin. First component will become X-coordinate and second one Y-coordinate. Clicking the "Settings..." button will open a dialog where plot settings can be configured.

Keys: